OGER web APIs
Table of Contents
Introduction
- New, see this screencast presentation for instructions on how to use OGER and some scientific and technical background.
This document briefly describes what are OGER APIs, and how to use them, in a few simple steps.
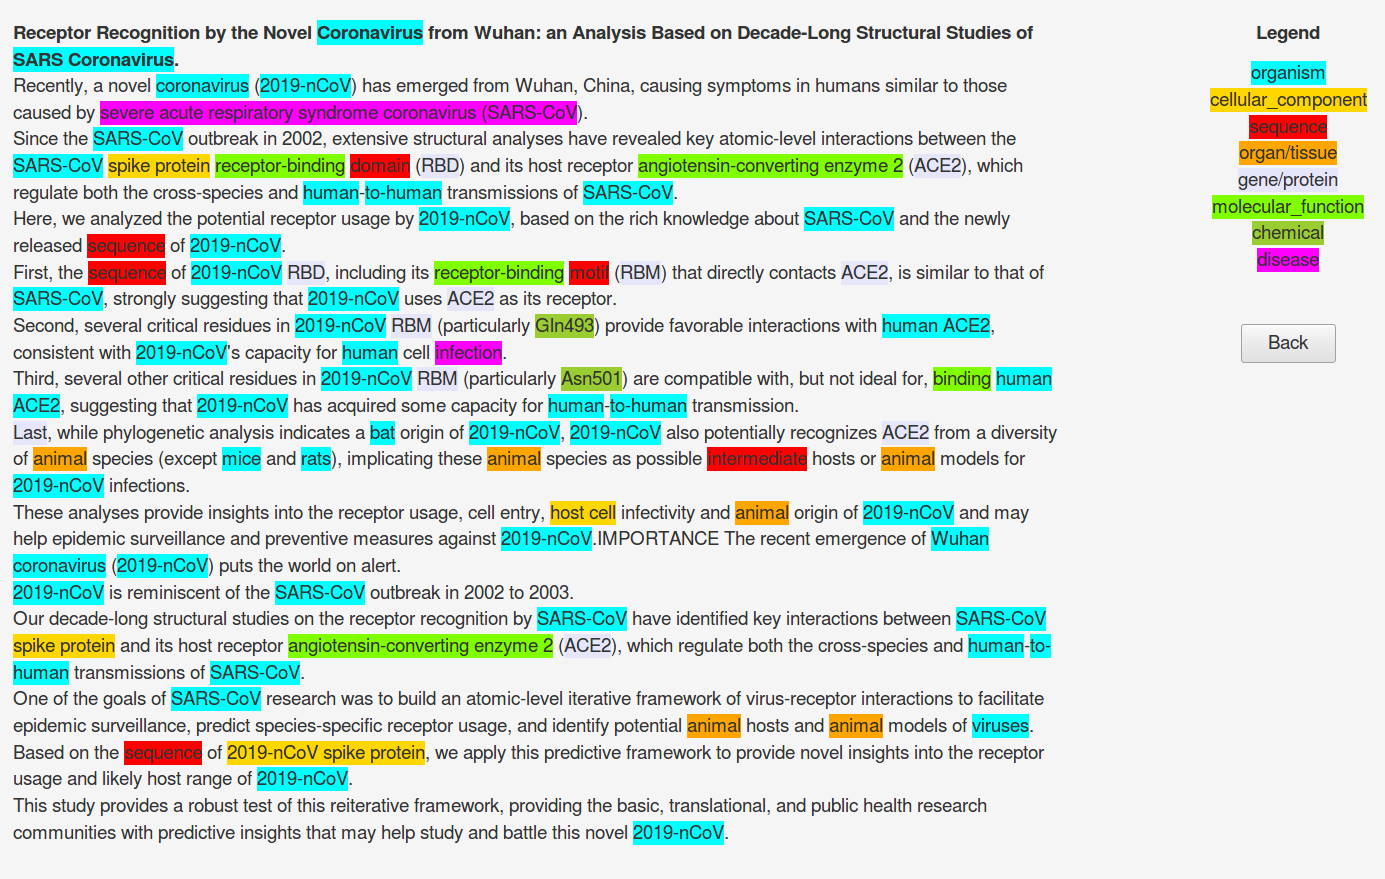
OGER is a fast, accurate entity annotation tool, which is accessible either as a software package, or as a web service. Given text as input, it delivers annotations as output, as illustrated in the picture below.
The dictionaries used for annotation are obtained from major life science databases (cellosaurus, cell ontology, ChEBI, CTD, EntrezGene, Gene Ontology, MeSH, Molecular Process Ontology, NCBI Taxonomy, Protein Ontology, RxNorm, Sequence Ontology, Swiss-Prot, Uberon).
OGER dictionaries are sourced and kept synchronized with the original databases through usage of our own Bio Term Hub.
OGER APIs are Web service APIs (type REST) that allows easy access to online OGER annotation capabilities.
API short description
You can create requests to the OGER API by adding specifiers to the base URL:
https://oger.nlp.idsia.ch/
With the APIs it is possible to:
- Check the service status
- Create new dictionaries and check their status
- Annotate
- Documents that are in the local machine (upload)
- Documents fetched from PubMed (fetch)
- Main available endpoints (specifiers):
/status(check status of the service)/fetch(fetch documents and process them, used for PubMed and PMC)/upload(used to submit your own text for processing)/dict(manipulate dictionaries)dict/{}/status
A more detailed description of the API can be found here.
Below you can find examples of how to perform an online annotation.
Step 1: verify the service, and get ID of the default dictionary
Verify that the service is up and running.
curl --location --request GET 'https://oger.nlp.idsia.ch/status'
This should respond something similar to:
{
    "status": "running",
    "active annotation dictionaries": 2,
    "default dictionary": "509f822aaf527390"
}
From the response it can be see that the default dictionary is the one identified with the hextoken 509f822aaf527390. This is the dictionary that would be used for the annotation if no other is explicitly passed within the annotation request.
Step 2: verify the status of the selected dictionary
Verify the availability and status of the dictionary that you want to use.
The complete URL of the request will be composed by the base URL, the endpoint dict, the
dictionary ID, and the specific request (status in this case), thus:
https://oger.nlp.idsia.ch/dict/509f822aaf527390/status
If you run the following request you will get the status and description of the dictionary:
curl --location --request GET 'https://oger.nlp.idsia.ch/dict/509f822aaf527390/status'
This would respond with something similar to:
{
    "status": "ready",
    "description": "default+COVID terminology"
}
So, we are ready to go.
It is also possible to request a new dictionary based on specific settings, find out more in https://github.com/OntoGene/OGER/wiki/REST-API.
Step 3: annotate a PubMed abstract
We can request the annotation of a PubMed abstract by using the fetch endpoint. We need
to specify which source to consider. Currently only Pubmed (pubmed) and PubMed Central
(pmc) are enabled. Next we ned to provide the output format, the easiest to use is
tsv. And finally we need to provide the ID of the resource that we intend to process.
For example let's assume that we want to process the PubMed abstract 21436587.
The final URL will be:
https://oger.nlp.idsia.ch/fetch/pubmed/tsv/21436587
And the most basic format to request the annotation is the following:
curl https://oger.nlp.idsia.ch/fetch/pubmed/tsv/21436587
The output will be delivered to your shell (standard output), so you might want to redirect to a file, e.g.
curl https://oger.nlp.idsia.ch/fetch/pubmed/tsv/21436587 > 21436587.tsv
The format of the output is explained below.
Notice that since we are using the default dictionary, we do not need to specify it explicitly. If we wanted to use a different dictionary, it would have to be explicitly specified in the request, e.g.
curl https://oger.nlp.idsia.ch/fetch/pubmed/tsv/21436587?dict=509f822aaf527390
Step 4: annotate an arbitrary snippet of text
We can request the annotation of local data by doing a POST to the /upload endpoint and passing the route parameters that specify the input and output format.
The URL of the request will be composed of the base URL
(https://oger.nlp.idsia.ch/), the target endpoint (upload),
the input format specification (txt) and the output format specification (tsv), so the
final URL will be:
https://oger.nlp.idsia.ch/upload/txt/tsv
Note: the different I/O formats supported by OGER are documented here.
Below there is an example of the request. In this example the uploaded data is raw text (txt), the requested output format is a tabular table (tsv) and the text to be annotated is passed in the POST payload.
curl --location \
--request POST 'https://oger.nlp.idsia.ch/upload/txt/tsv' \
--header 'Content-Type: text/plain' \
--data-raw 'The initial cases of novel coronavirus (2019-nCoV)-infected
pneumonia (NCIP) occurred in Wuhan, Hubei Province, China, in December 2019
and January 2020.
We analyzed data on the first 425 confirmed cases in Wuhan to
determine the epidemiologic characteristics of NCIP.We collected
information on demographic characteristics, exposure history, and
illness timelines of laboratory-confirmed cases of NCIP that had been
reported by January 22, 2020.'
Find below a response example:
 Note: click on the picture to see a larger version in a separate tab.
The fields that you can see in this TSV output format are described in detail here.
If we do the same request but change the output format from tsv to bioc_json, we get the following response:
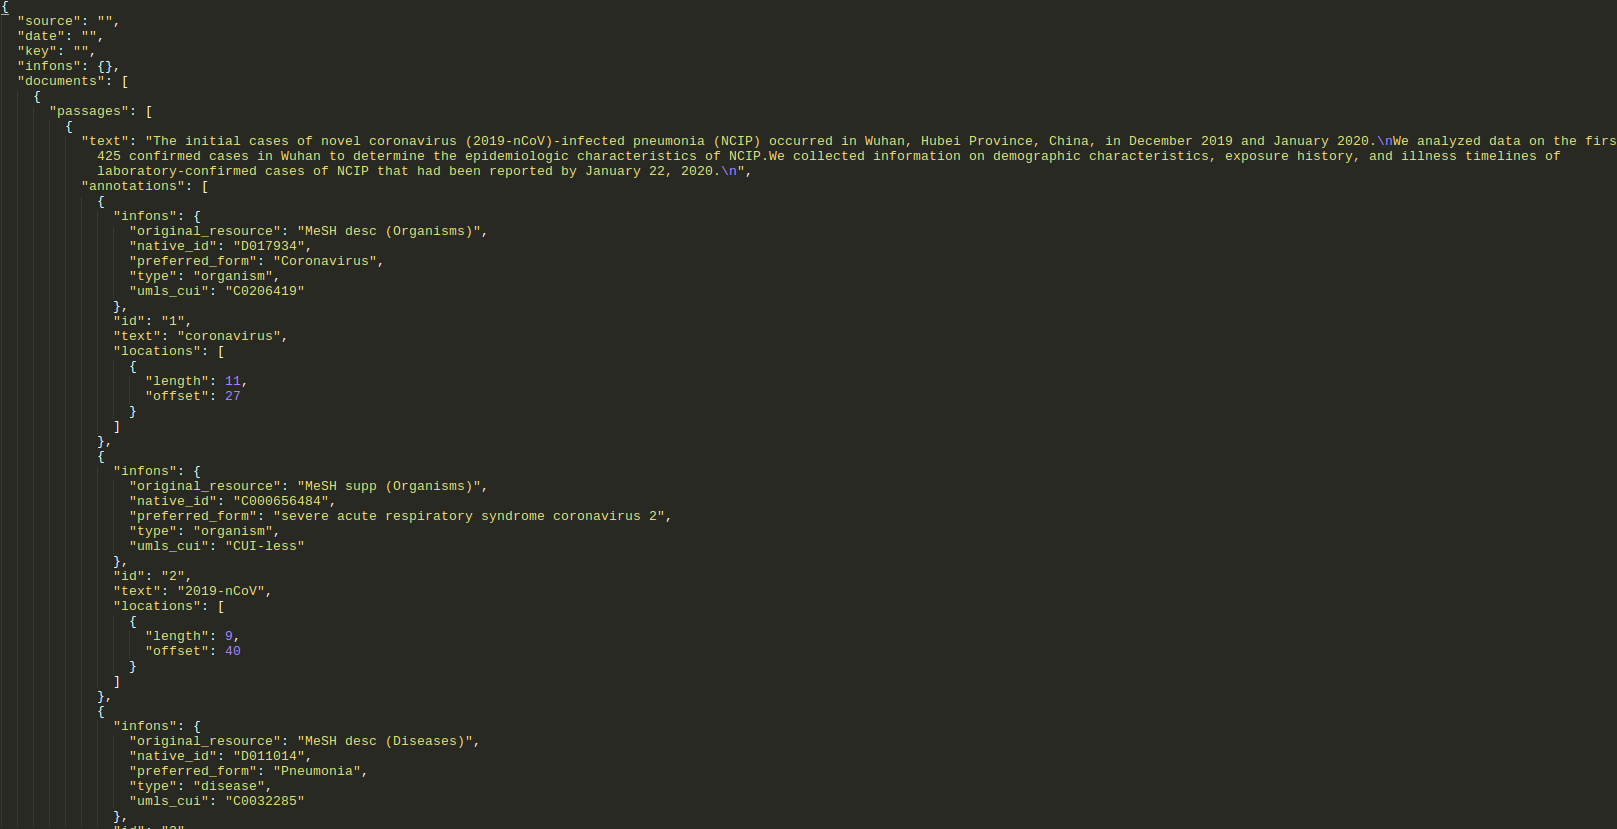 Note: click on the picture to see a larger version in a separate tab.
The different I/O formats supported by OGER are documented below.
I/O formats
OGER can deal with different input and output formats, as shown in the tables below. The 'Format' specifier (first column of each table) can be used as a specifier in a OGER request to (a) submit input data in different formats, and (b) request the output in the specified output format.
Input formats
| Format | Content-type | Description |
| txt | text/plain | unstructured plain-text document |
| bioc | text/xml | document or collection in BioC XML |
| bioc_json | application/json | document or collection in BioC JSON |
| pxml | text/xml | abstract in PubMed's citation XML |
| nxml | text/xml | article in PubMed Central's full-text XML |
| pxml.gz | application/gzip | compressed collection of abstracts in Medline's citation XML |
Output formats
| Format | Content-type | Description |
| tsv | text/tab-separated-values | entities in a tab-separated table |
| xml | text/xml | entities in a simple, self-explanatory XML format |
| text_tsv | text/tab-separated-values | text and entities in a tab-separated table |
| bioc | text/xml | text and entities in BioC XML |
| bioc_json | application/json | text and entities in BioC JSON |
| pubanno_json | application/json | text and entities in PubAnnotator JSON |
| pubtator | text/plain | text and entities in PubTator format (mixture of pipe- and tab-separated text) |
| pubtator_fbk | text/plain | a variant of the above, with slightly different entity attributes |
| odin | text/xml | text and entities in ODIN XML |
| odin_custom | text/xml | text and entities in ODIN XML, with customisable CSS |
More information about the annotation parameters is available at https://github.com/OntoGene/OGER/wiki/REST-API
Visualization of the annotations
Notice that some of the output formats are oriented towards data processing (tsv, bioc, bioc_json), while some of them are oriented towards visualization (pubanno_json, pubtator, odin_custom).
In particular you can test the following ways to visualize the output of OGER:
- use the
pubtatorformat to produce output which can then be visualized with the well-know PubTator tool - use the
pubanno_jsonformat, to be visualized with the PubAnnotation tool. You can also send some text to be annotated and visualized directly in PubAnnotation. Try it here. - use the
odin_customoutput format to visualize ODIN output directly in your browser. This is a simple xml format which can be either visualized as xml (see example), or embellished with css decorations (see here).
If you want to visualize your files as suggested above, you have to edit them and add the following line:
<?xml-stylesheet type="text/css" href="odin_custom.css"?>
You can download here the odin_custom.css file. Notice that the xml file and the css file must be in the same directory. Then open the xml file in any browser.
Documentation on the annotation fields
If you use the tsv format as your output format, the resulting output will contain one line for every discovered term. Each line contains the following tab-separated fields:
- paper identifier (pubmed id)
- type of entity
- start offset
- end offset
- term as found in the paper
- preferred term
- term id
- section of the paper where term has been found
- sentence ID
- name of source vocabulary / database
- common term identifier
Notice that
- (7) is the unique identifier of the term as from the corresponding reference database, which is indicated by (10).
- (6) is a term semantically equivalent to the one found in the paper (5), but which is indicated in the reference database as the "best" or normative term for the corresponding concept
- (11) is a common identifier, in cases where we have one. In most applications we try to provide an UMLS CUI at this position.
Also notice that the same span of text might generate multiple annotations. This is the case when a term is ambiguos, so that several potential annotations can be applied to it.
Who are we?
This page is currently maintained by the NLP Group at the Dalle Molle Institute for Artificial Intelligence (IDSIA).
The work described in this page was initially carried out by the Biomedical Text Mining group at the Institute of Computational Linguistics, University of Zurich. It is now being continued at IDSIA where the PI of the group (Fabio Rinaldi) and some group members have moved.
For additional information about the tools and research activities described in this page, please contact Fabio Rinaldi.